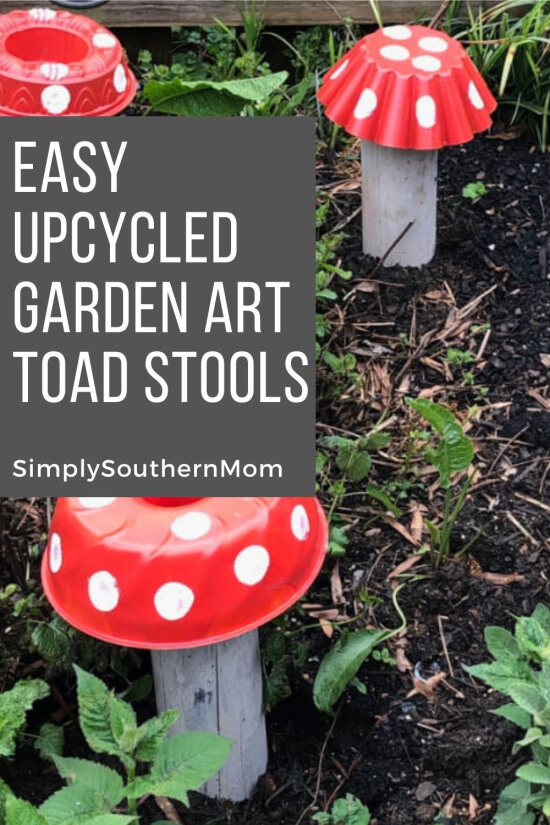
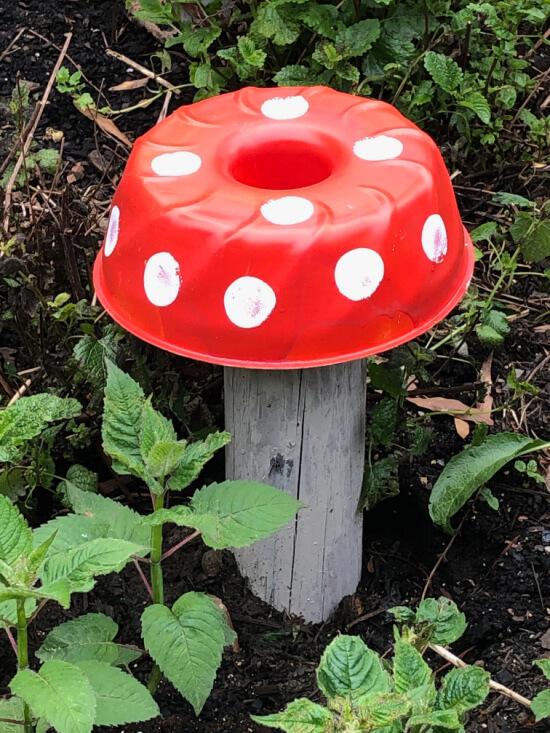
My garden is a work in progress. The kids complain I enjoy gardening so much I change our garden designs yearly. And, they’re correct. They’ve come to expect funky upcycled garden art scattered around my flower beds. This year I decided to finally ‘do something about’ the unsightly metal pole stuck in one of my beds. It was once the base of a long-gone metal grill that fell apart immediately after we purchased the house. Because it included a working gas line, we weren’t sure how to remove it. We turned off the gas and the pole sat there unused and unwanted. Nothing I did made the pole look any better. Then, I found a picture of upcycled garden art toadstools on Pinterest. I knew I had finally found an easy, low-cost fix!
Upcycled Garden Art Toadstools Easy Tutorial
This was the solution I had been looking for. Neighbors, friends, and family admired my toadstool. You make be thinking, “That’s great for you, Pam, but I don’t have an ugly metal pole I want to cover.” No problem! I liked my toadstool so much I made more for the garden. Here’s how to make them with leftover wood scraps.
What You Need to Make the Toadstools
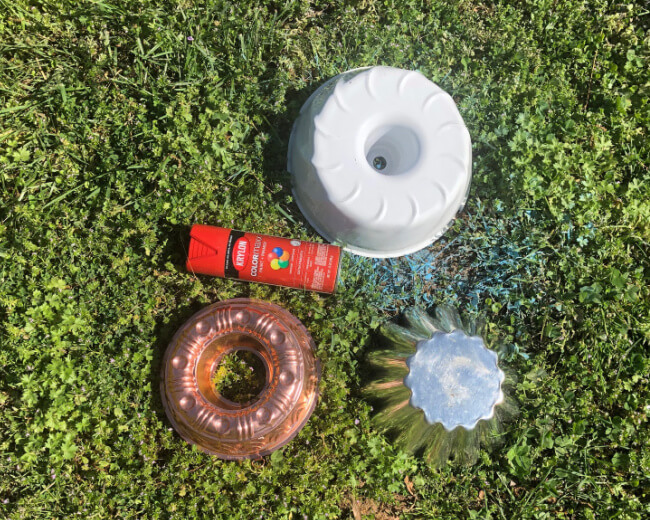
- Old Bundt Pans
- Outdoor Spray Paint– I used Krylon ColorMaxx in Pimento and Rustoleum Painter’s Touch 2X in Smokey Beige
- Outdoor Paint– I used Latex and Floor Paint because I was painting a rug on my patio, but something like Plaid FolkArt Outdoor Paint in White will work. It’s also a lot cheaper if you’re only using a small amount.
- A Round Sponge Brush
- Wood Scraps
- Outdoor Glue- like Epoxy 6000
Tips for Making the Toadstools:
- I purchased a variety of Bundt pans and molds to make my toadstools. I found that the decorative metal molds were the hardest to add circles onto. The paint ran and made lines down the sides of the mold.
- You can find old Bundt pans and molds at thrift stores, flea markets, yard sales, or estate sales. I purchased all of mine for between 99 cents and $2.99 each. You could also use old bowls you’ve painted in different colors. IF you use glass bowls, be sure to purchase a paint formulated for glass.
- One can of paint should cover up to 10 to 12 Bundt Pans and molds, maybe even more.
- You can purchase a set of 3 round sponge brushes at Dollar Tree for a buck. That’s the cheapest I’ve seen them anywhere.
- I used leftover pieces of round landscape timber for the base of my toadstools. Before beginning the project make sure the base is evenly cut.
- Before applying the white paint, blot as much off of the brush as possible. This helps prevent the paint from running down the sides.
- Use a glue specially formulated for outdoor use. This will ensure that your art *should* last through all sorts of weather.
- Use outdoor paint designed for wood and metal. This will make your life easier! It will help prevent rust and not wash off during storms.
How to Make Upcycled Garden Art Toadstools:
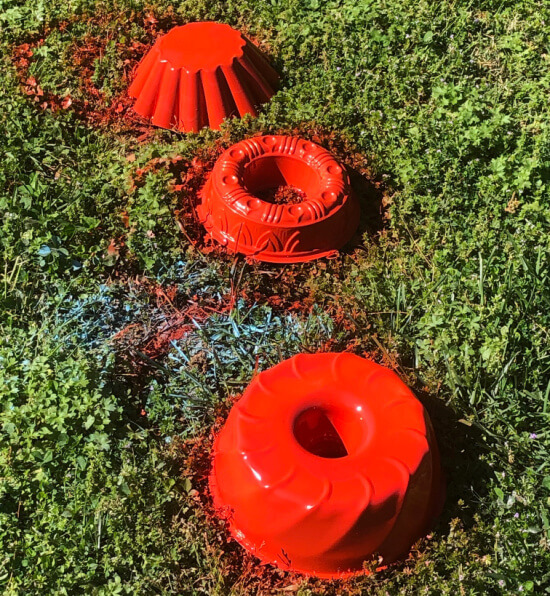
- Place the Bundt pans on the ground or on a piece of paper or plastic. Spray the Bundt pans with the Pimento (or color of your choice) paint. Check to make sure the entire outside of the Bundt pan is covered with paint. Allow the paint to dry-this happens quickly if the weather is warm! Check the Bundt pans and touch up any unpainted spots. Allow to dry.
- While the Bundt pans are drying, spray paint the wood scraps. This is easier if you stand them up before painting. Allow the paint to dry. If the scraps have not been previously painted, they will soak in the paint. You’ll probably need two coats. Repaint, if necessary.
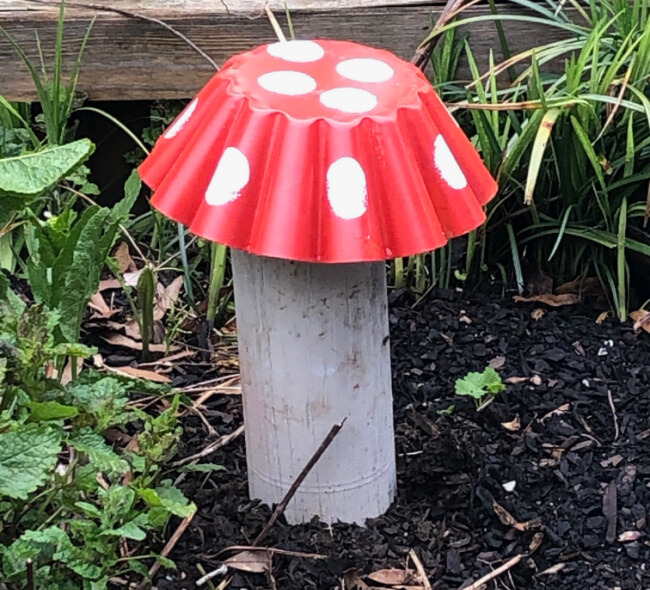
- Dip the round brush in the white (or color of choice) outdoor paint. Blot the brush until it is almost dry. Add circles around the sides and top of the Bundt pan in any pattern you like. Gently wipe off any drips or splatters with a paper towel. Allow the pan to dry.
- Dig a small (1 to 2 inch) hole where ever you want the toadstools. Place the base of the toadstool into the hole and refill with dirt. Place a thin line of glue around the top of the wood scrap. Set the Bundt pan or mold on top of the wood scrap. Allow the glue to dry.
These toadstools are an adorable addition to the garden. Plus, I’ve finally found something that covers the ugly pole and looks like it belongs there. Feel free to ask any questions you might have about the project. Stay tuned as we rework through our gardens and patio or check out some of the posts in our gardening section. What are your favorite ways to upcycle in the garden?
You Might Like These Posts: