2020 was an “interesting” year. At the end of the growing season, I discovered all my roses had rose rosette disease. There’s no cure, it kills the bushes, and it had spread to every single one of my rose bushes. When 2021 arrived, I dug up all 20 of my rose bushes and sadly threw them away. Since I had to re-do all my flower beds to replace the roses, I thought, “Why not redo the patio too?” I did not think about how much time that would take. It’s slowly coming together (watch for more projects and the final reveal in the future.)
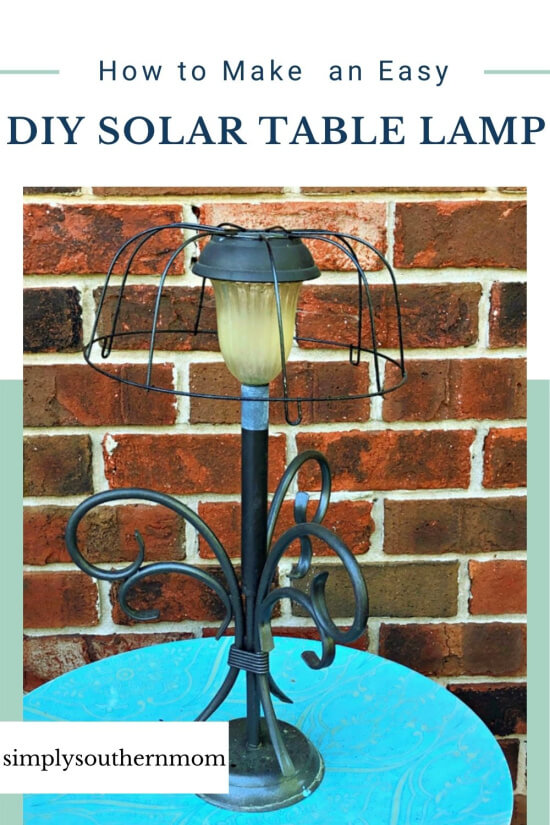
One thing our patio lacked was light. We have one bright electric light that attracts bugs and mosquitos. We needed something cute. Something that would add ambiance. I found it with these DIY Outdoor Solar Table Lamps.
DIY Outdoor Solar Table Lamps Tutorial
I searched through Pinterest to find an idea I liked and finally stumbled across one similar to the ones I made. The problem? There was no tutorial included- just a picture. “How hard can this be?” I asked myself. Turns out, it’s not hard at all and the project comes together in just a few minutes.
Supplies You’ll Need:
- Old lamp bases
- screwdriver
- pliers
- metal hanging basket
- spray paint for outdoors, optional
- outdoor glue, like E6000
- solar lights
Where to Find the Materials:
- If you don’t have any old lamps lying around that you’d like to use, it’s easy to find them at thrift stores, yard sales, or, my personal favorite source, Habitat for Humanity. I was able to purchase 4 matching lamps for $3 each.
- Tip: If you have a favorite thrift store or Habitat for Humanity in your area, drop by once a week. You’ll be surprised at how quickly new items arrive and how quickly they are sold.
- Tip 2: If the item isn’t marked at your local Habitat for Humanity, ask the manager for a price. He will usually give you a good deal.
- The metal hanging baskets I used came from Dollar Tree. (4 for $4!)
- Spray paint, outdoor glue, and solar lights can be purchased from any big box store, most dollar stores, and home improvement stores.
- Tip: Choose outdoor paint with a primer included. It will save several steps.
How to Make the Lamps:
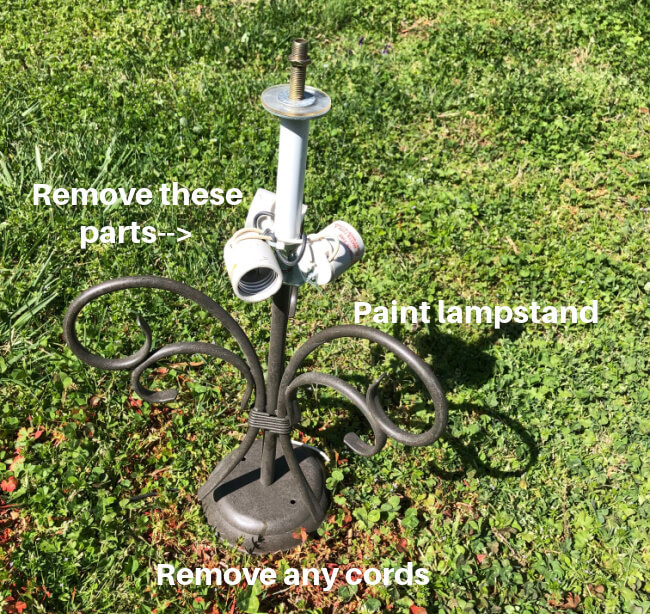
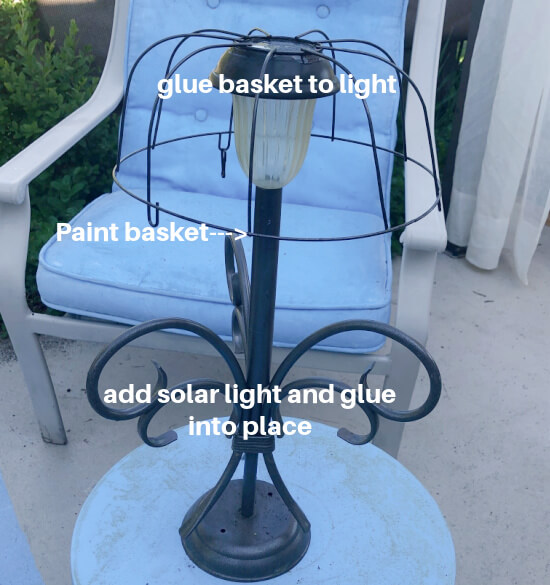
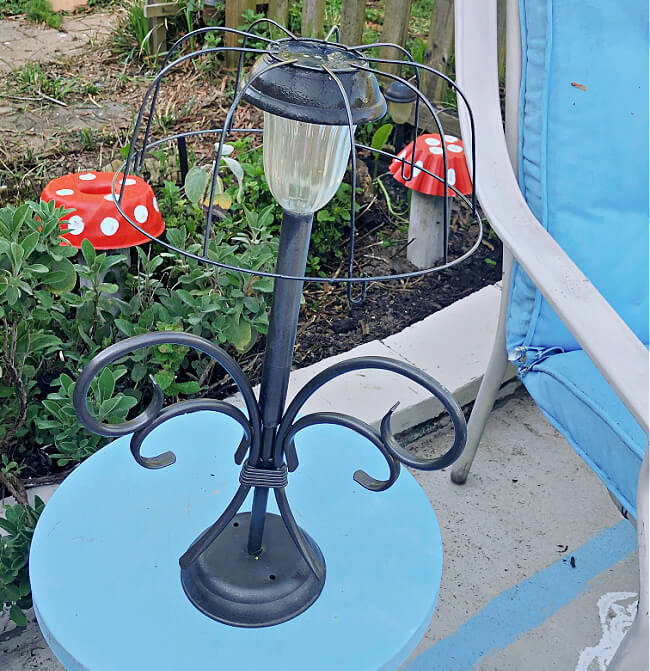
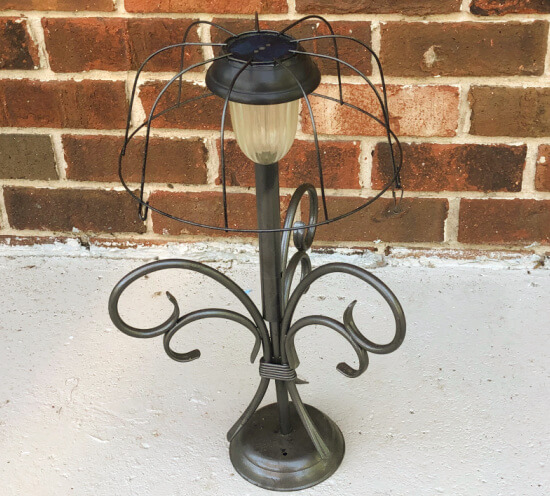
- Remove the shade, cord, and electrical parts from the lamp. Usually, this can be done by simply unscrewing the parts and pulling them from the lamp. For stubborn parts, you might need to pull them out with pliers and cut the cord.
- Remove the hanging cords from the metal planter. You can save these for another use if you like.
- Spray paint the lamp base and metal planter whatever color you desire. Allow it to dry completely before continuing. I use a lot of Rust-Oleum in my outdoor projects because it is designed to stop rust which is a risk for any item you keep outdoors in the weather. It’s also specially formulated to be used on patio furniture, outdoor light fixtures, and wrought iron. And, nope, I don’t get any kickbacks from Rust-Oleum, it’s just my preferred paint. This shade is Rust-Oleum Hammered in bronze.
- Remove the bottom of the solar light (the part that sticks into the ground). Add glue to the base of the solar light and place it on the lamp base. Allow time for the glue to dry. My preferred brand of glue is E6000 because it is industrial strength, dries clear, and is waterproof. Once again, I had to purchase my own glue.
- Place a small amount of glue around the edges of the top of the solar light. Carefully center the metal planter on top of the solar light. Allow the glue to dry before placing the lamp where ever you need light!
Cost for Making 4 lamps:
- 4 lamps from Habitat for Humanity $12
- 4 metal hanging baskets from Dollar Tree $4
- Solar lights- cleaned and used old solar lights I already had- $0
- Spray Paint and Glue have been used for several projects and weren’t purchased specifically for this
- Total Cost= $16 or $4 per lamp.
I compared the cost of these lamps to ones I found online and in the local stores. They ranged from $10 to $45 apiece for a similar (or smaller) sized lamp. Some of the shades were a little fancier, but, at the price I paid, I’m certainly not complaining. These lamps look adorable on my patio tables and, thankfully, don’t attract the bugs and mosquitos our bright porch light does.
I look forward to sharing other patio projects we’re completing with you including a painted concrete rug, the pergola makeover, and our patio furniture pillows make-over. What are you working on this spring and summer?
You Might Like These Posts: