In my “BC” (before children) life, I was a collector of antique glassware. I used the glassware for table settings and centerpieces during holidays. I soon discovered children and antique glassware do not mix. The problem? I still wanted cute centerpieces during the holidays. With my expensive serving pieces high on a shelf, safely out of reach, I needed another (preferably low-cost) solution. One day, as I was stacking dishes, I accidentally discovered I could make my own DIY pedestal serving trays to use for centerpieces. Best of all, I could buy a couple of pieces at the dollar store, for a basic investment of around two dollars, and create adorable looks for each season. Once I had the basic serving tray in place, I could create Holiday or Seasonal centerpieces for both my dining room and kitchen tables.
How to make a Pedestal Serving Tray:
For each tray, you will need:
One plate in your choice of pattern
one glass in your choice of pattern (I used a martini glass for the cute pattern)
Super glue or glass glue
rubbing alcohol
Directions to make the Pedestal Serving Tray
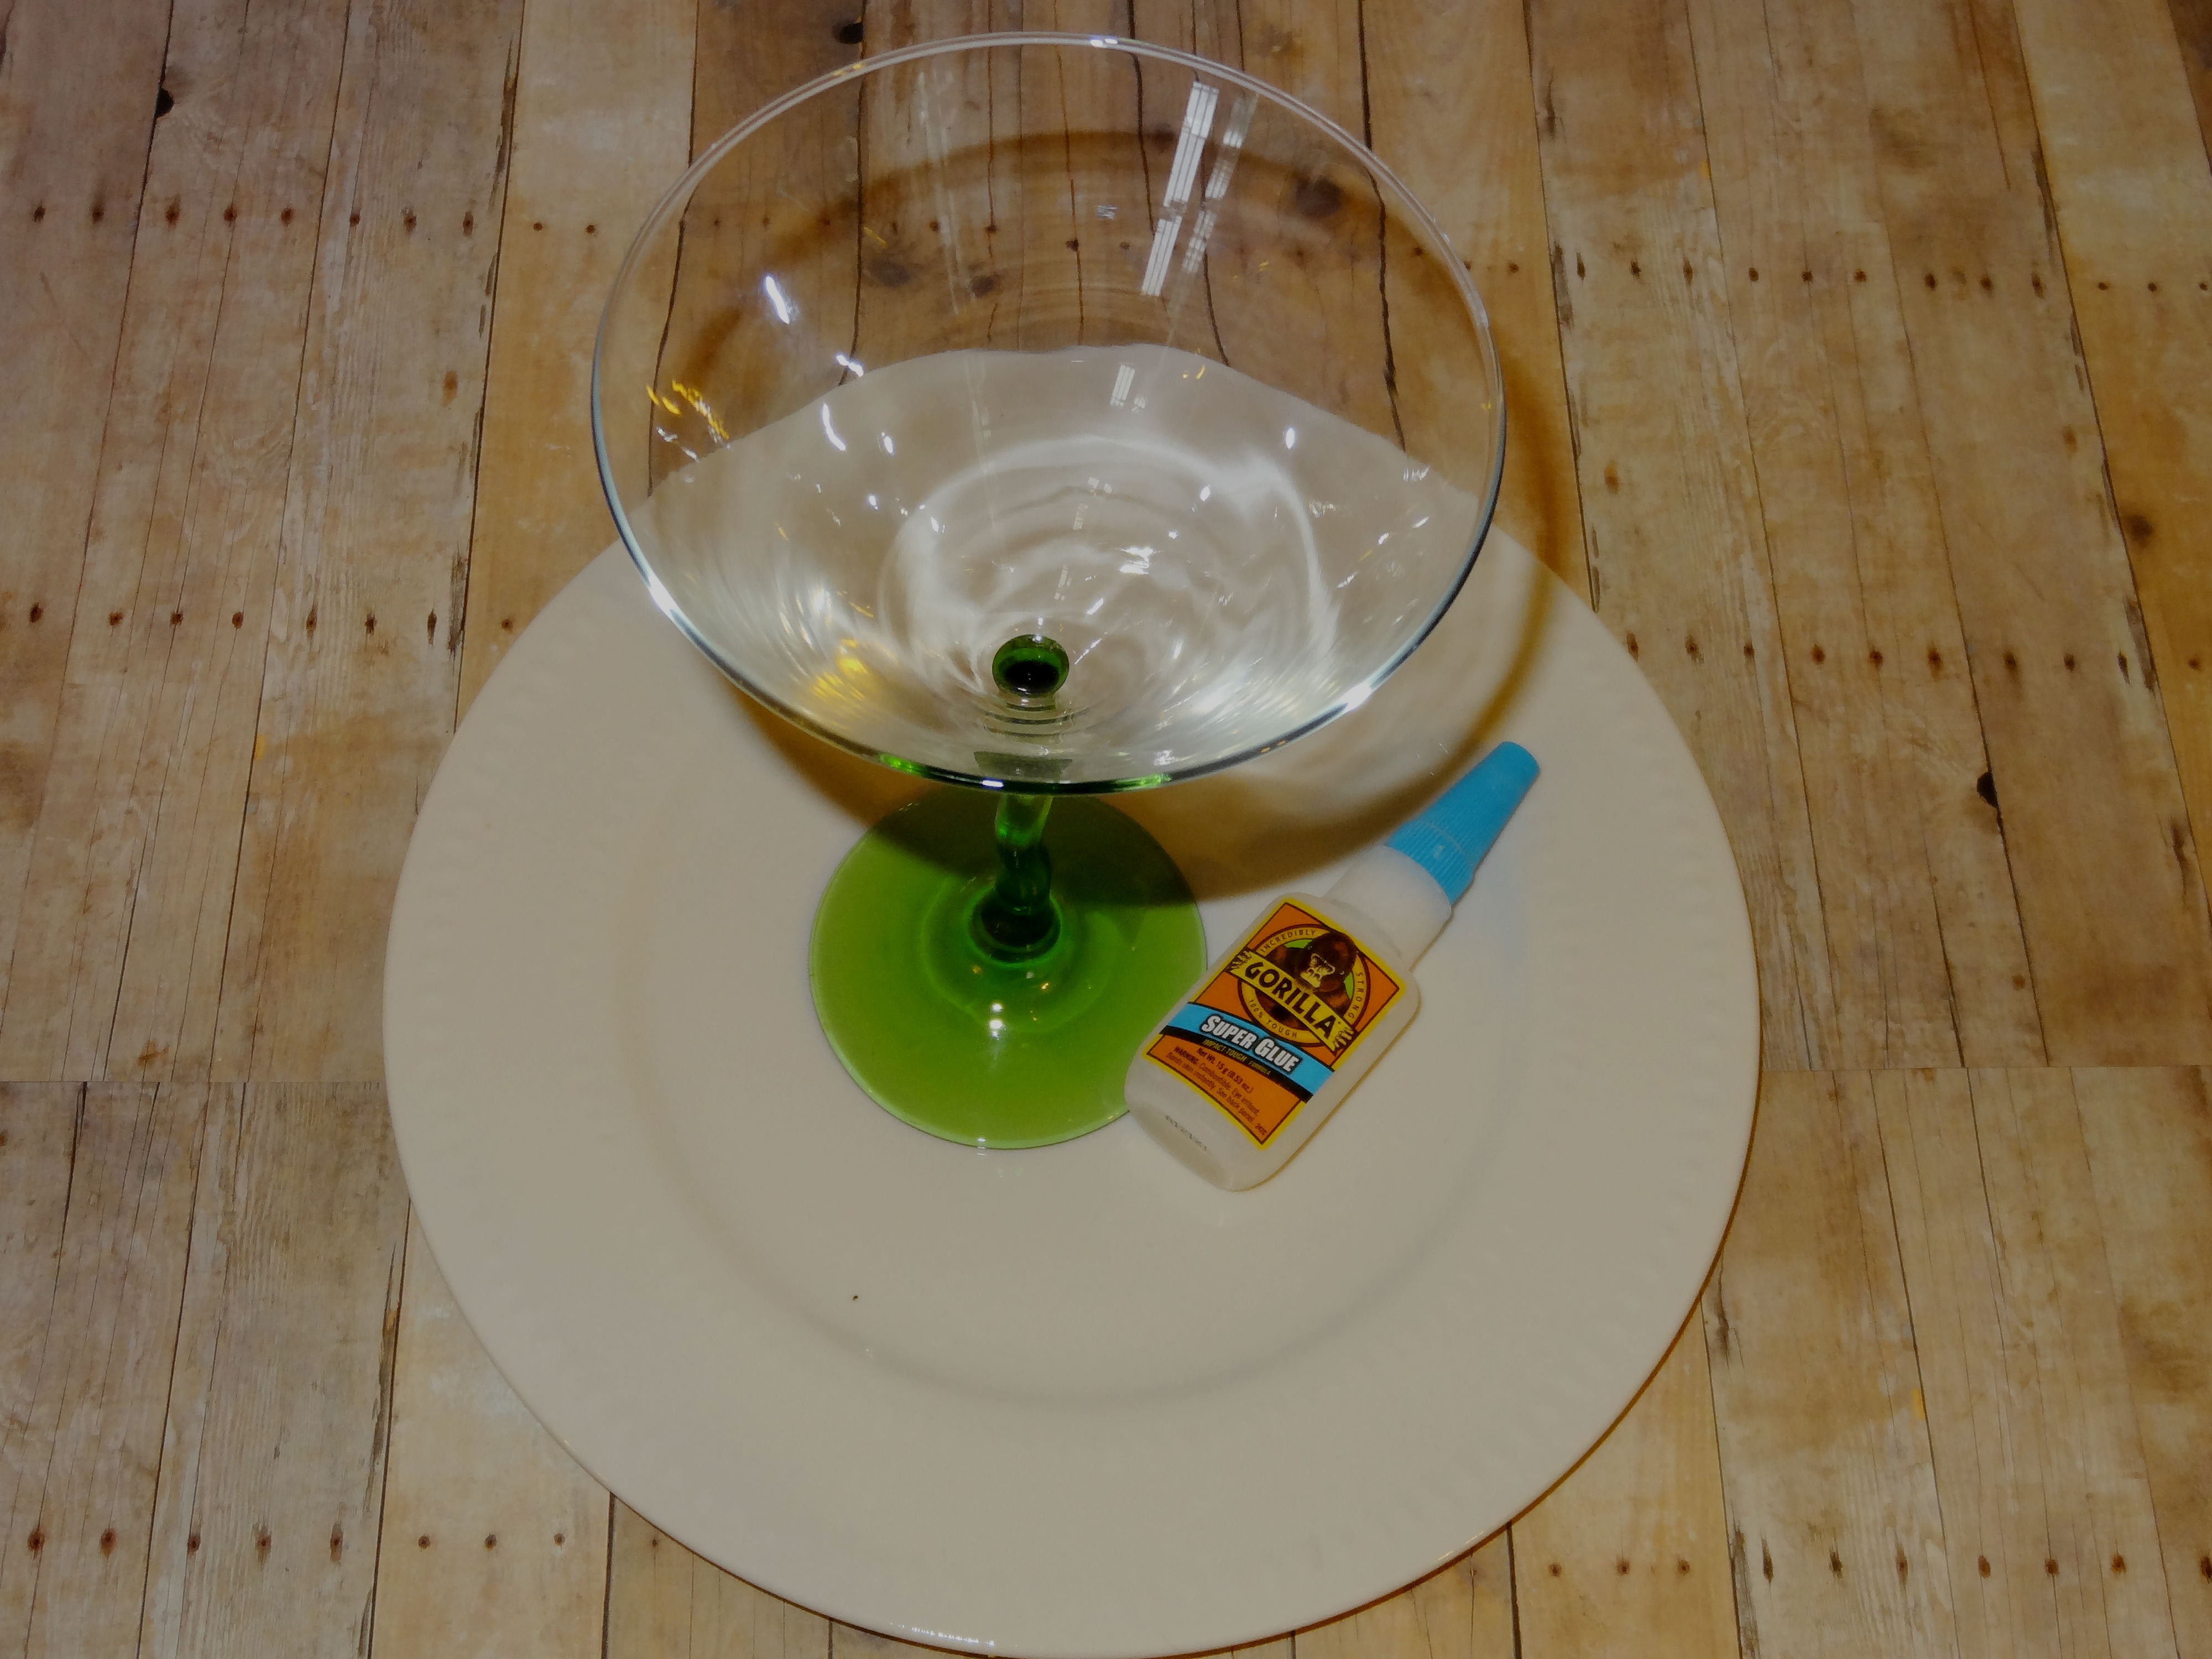
1. Wash the plate and the glass. Allow both pieces to dry completely.
2. Rub the back of the plate and the bottom of the glass with rubbing alcohol. Allow the alcohol to dry.
3. Apply super glue to the bottom of the plate in the center.
4. Place the bottom of the glass in the center of the plate in the glue. Allow glue to dry. If you prefer not to have the pieces glued together so they can be used separately in the future, just don’t add the step with the glue. Remember, the tray will not be as sturdy if the pieces are not glued together.
You can experiment with different plates and glasses. I like to use stemmed martini or wine glasses for the base. You can also use different sizes and shapes of glasses and plates.
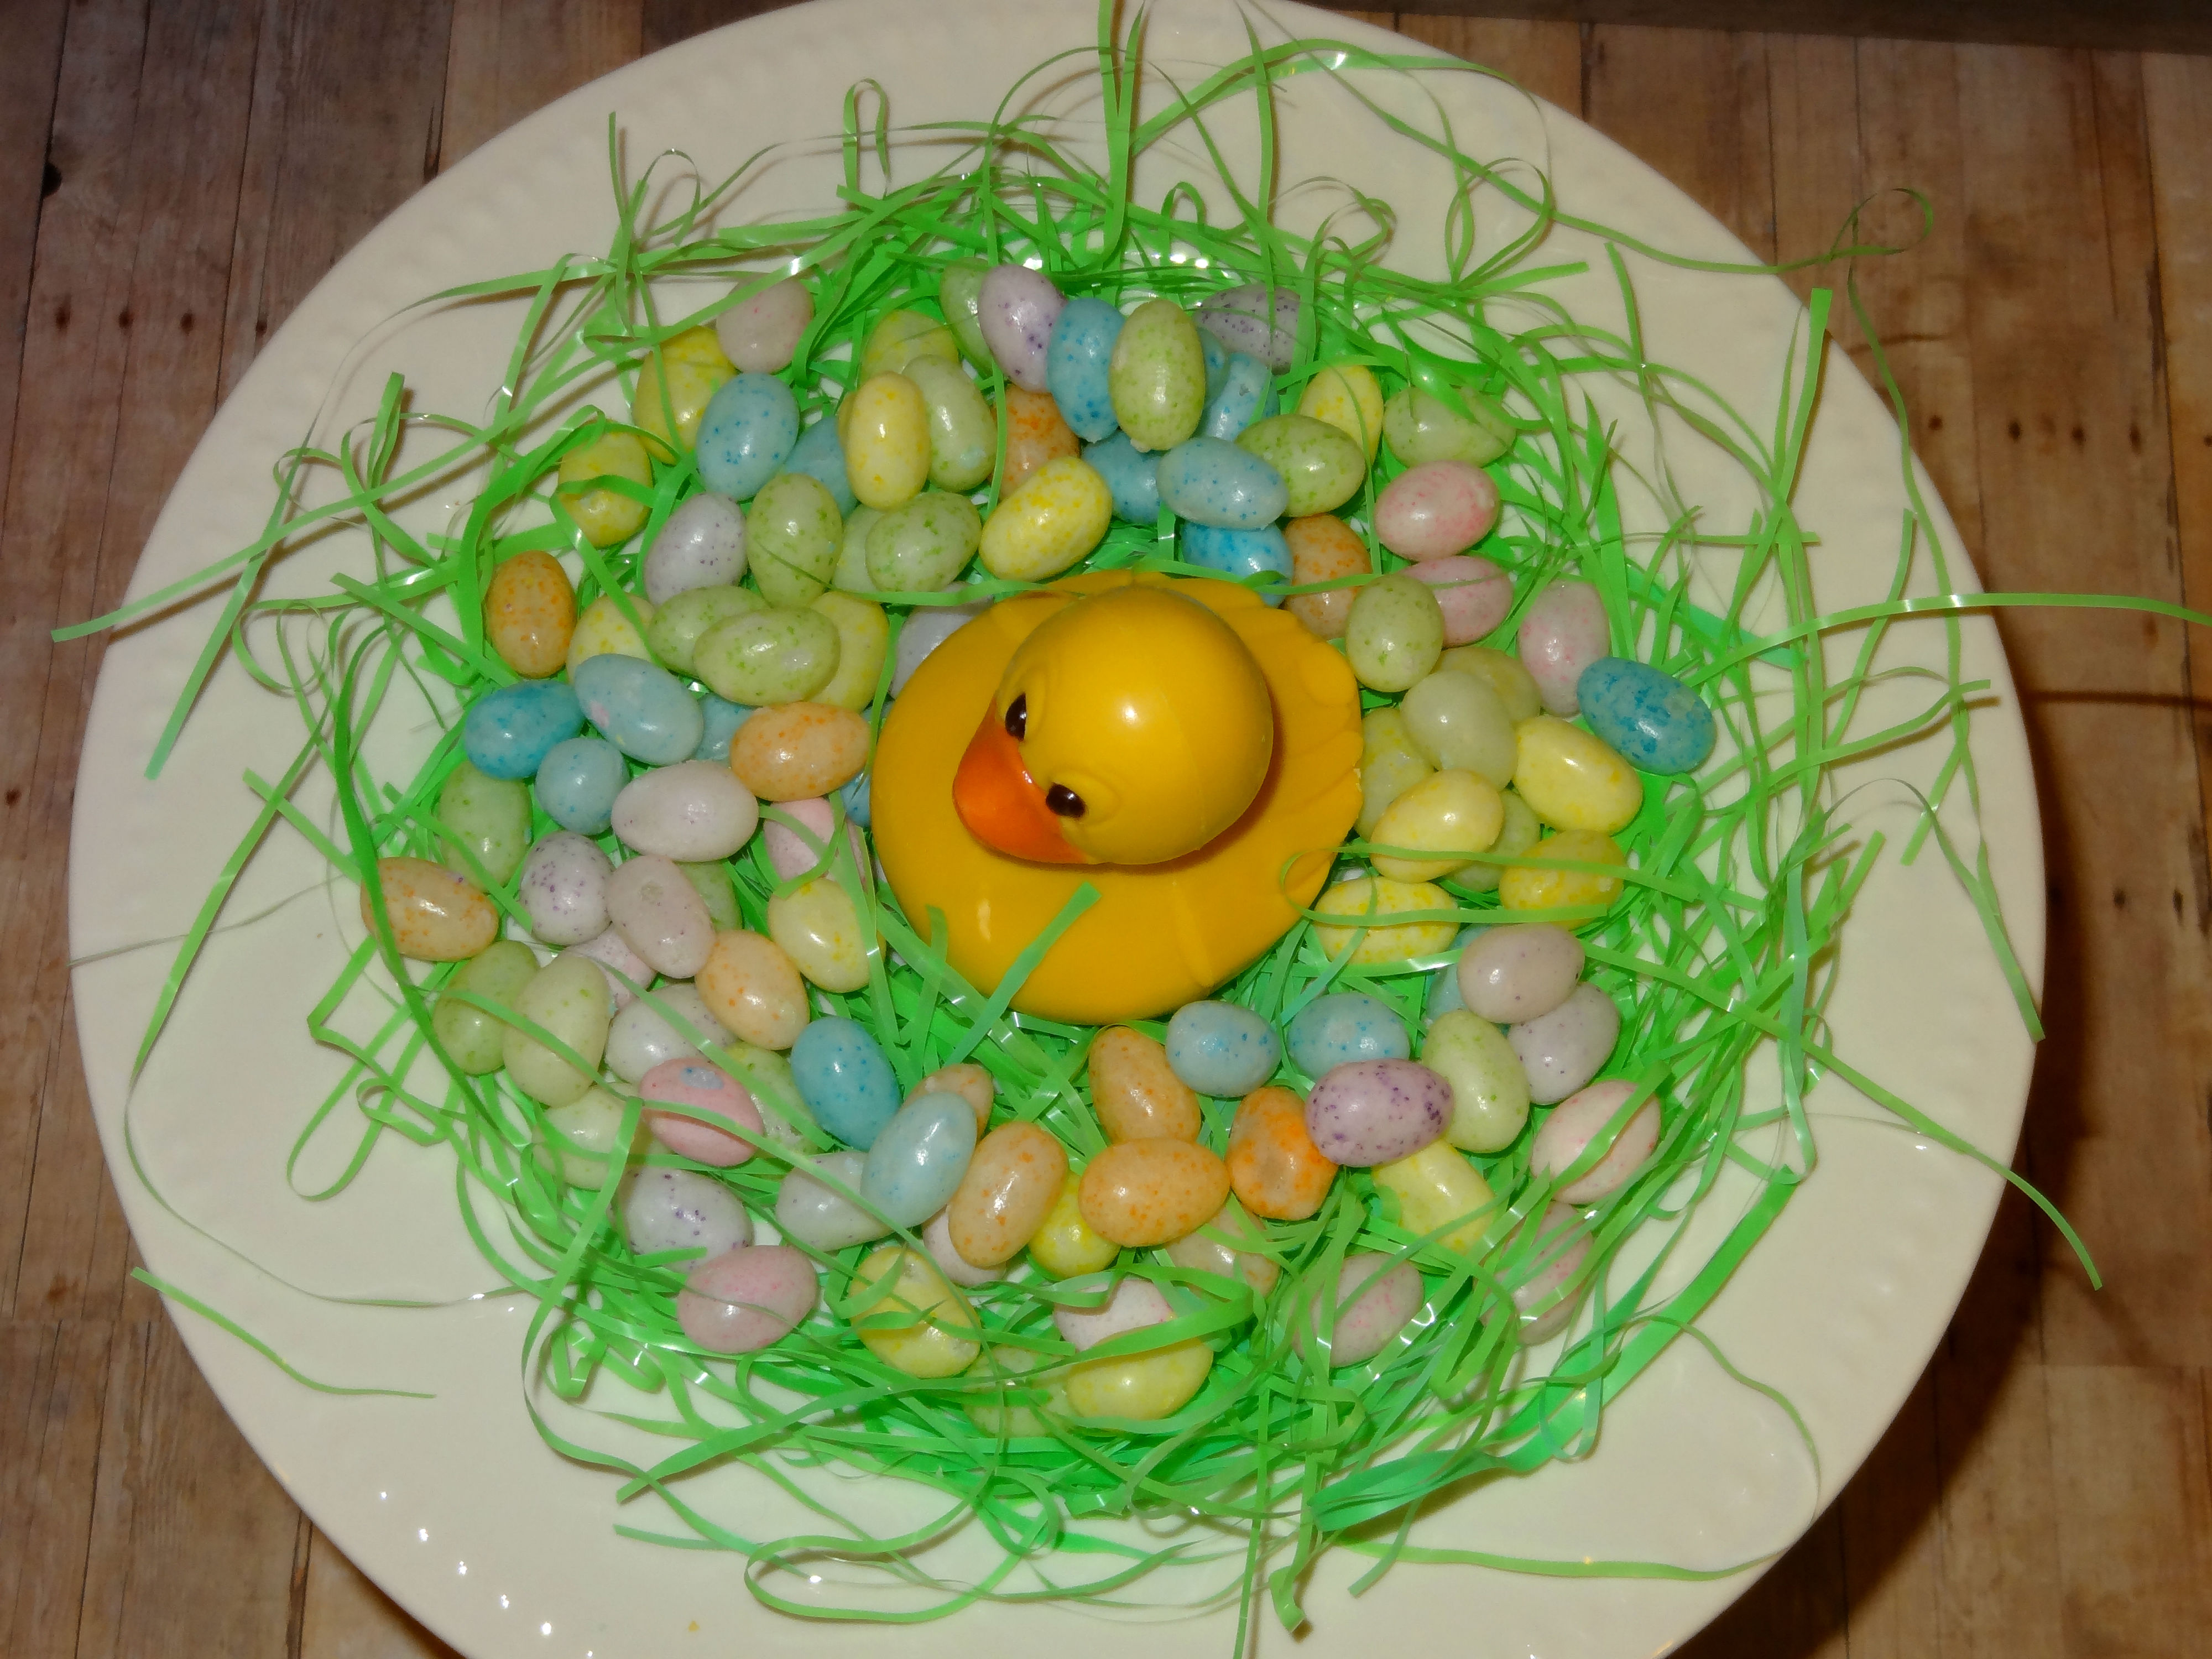
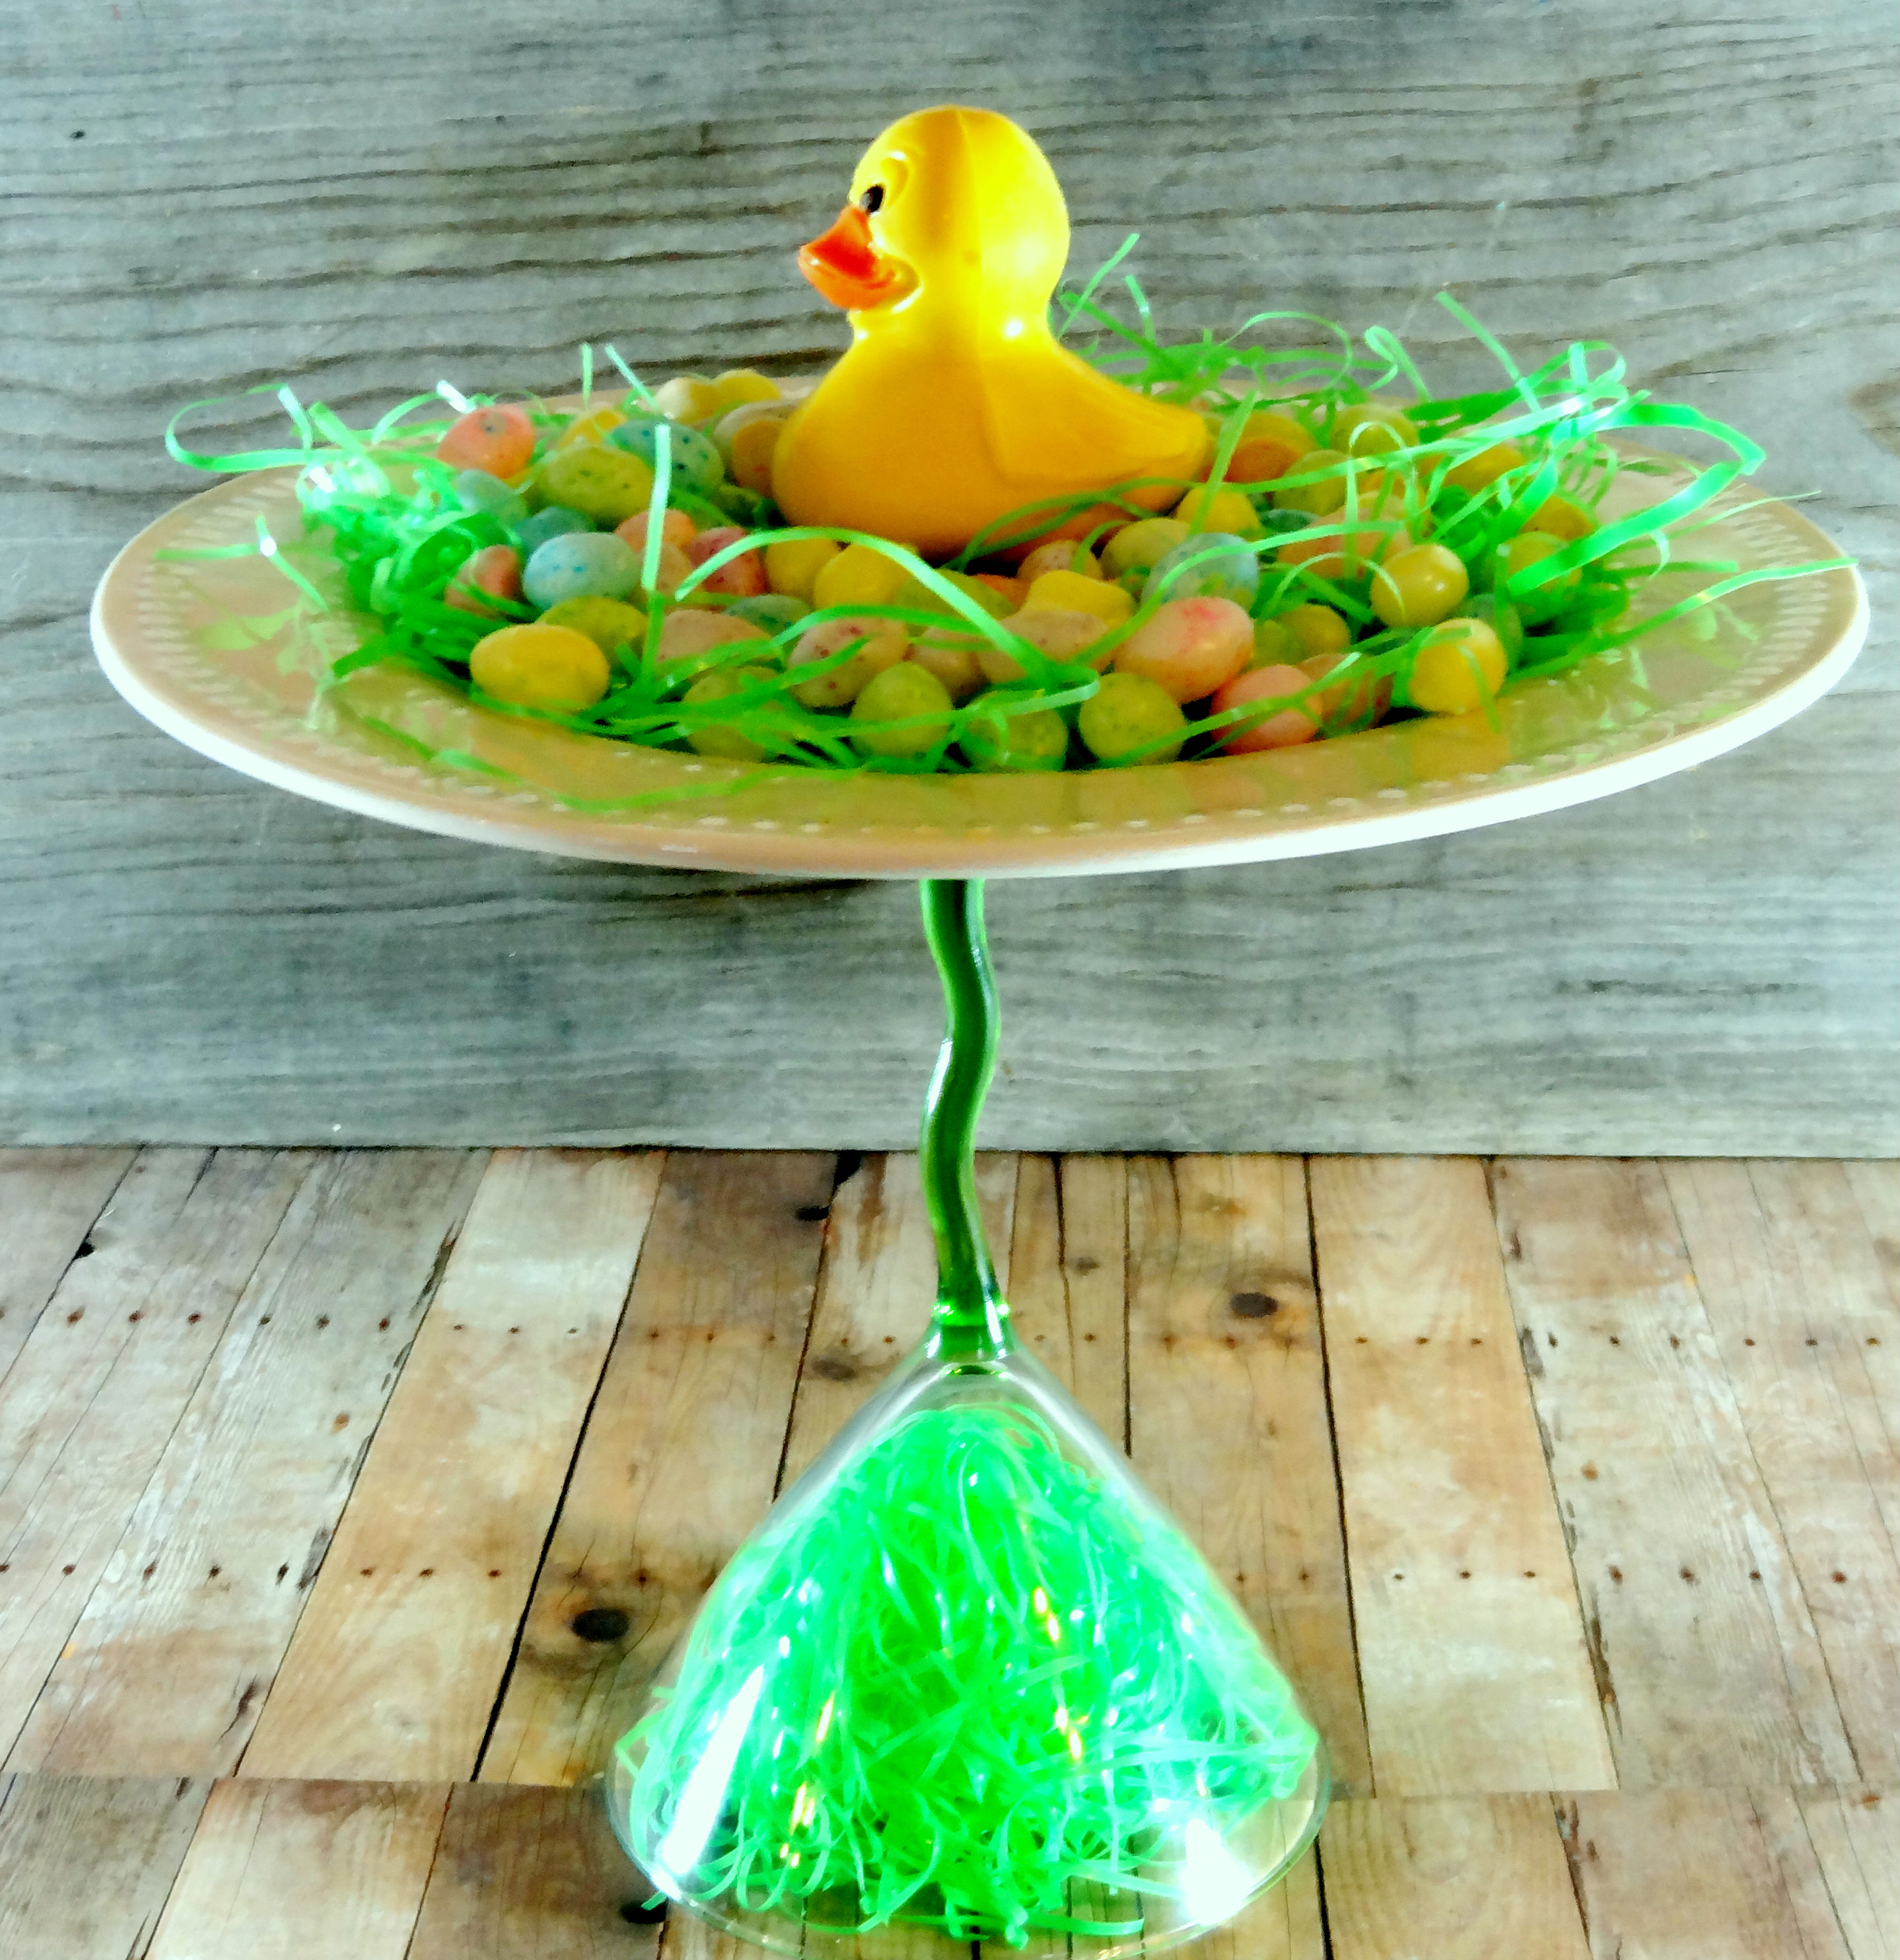
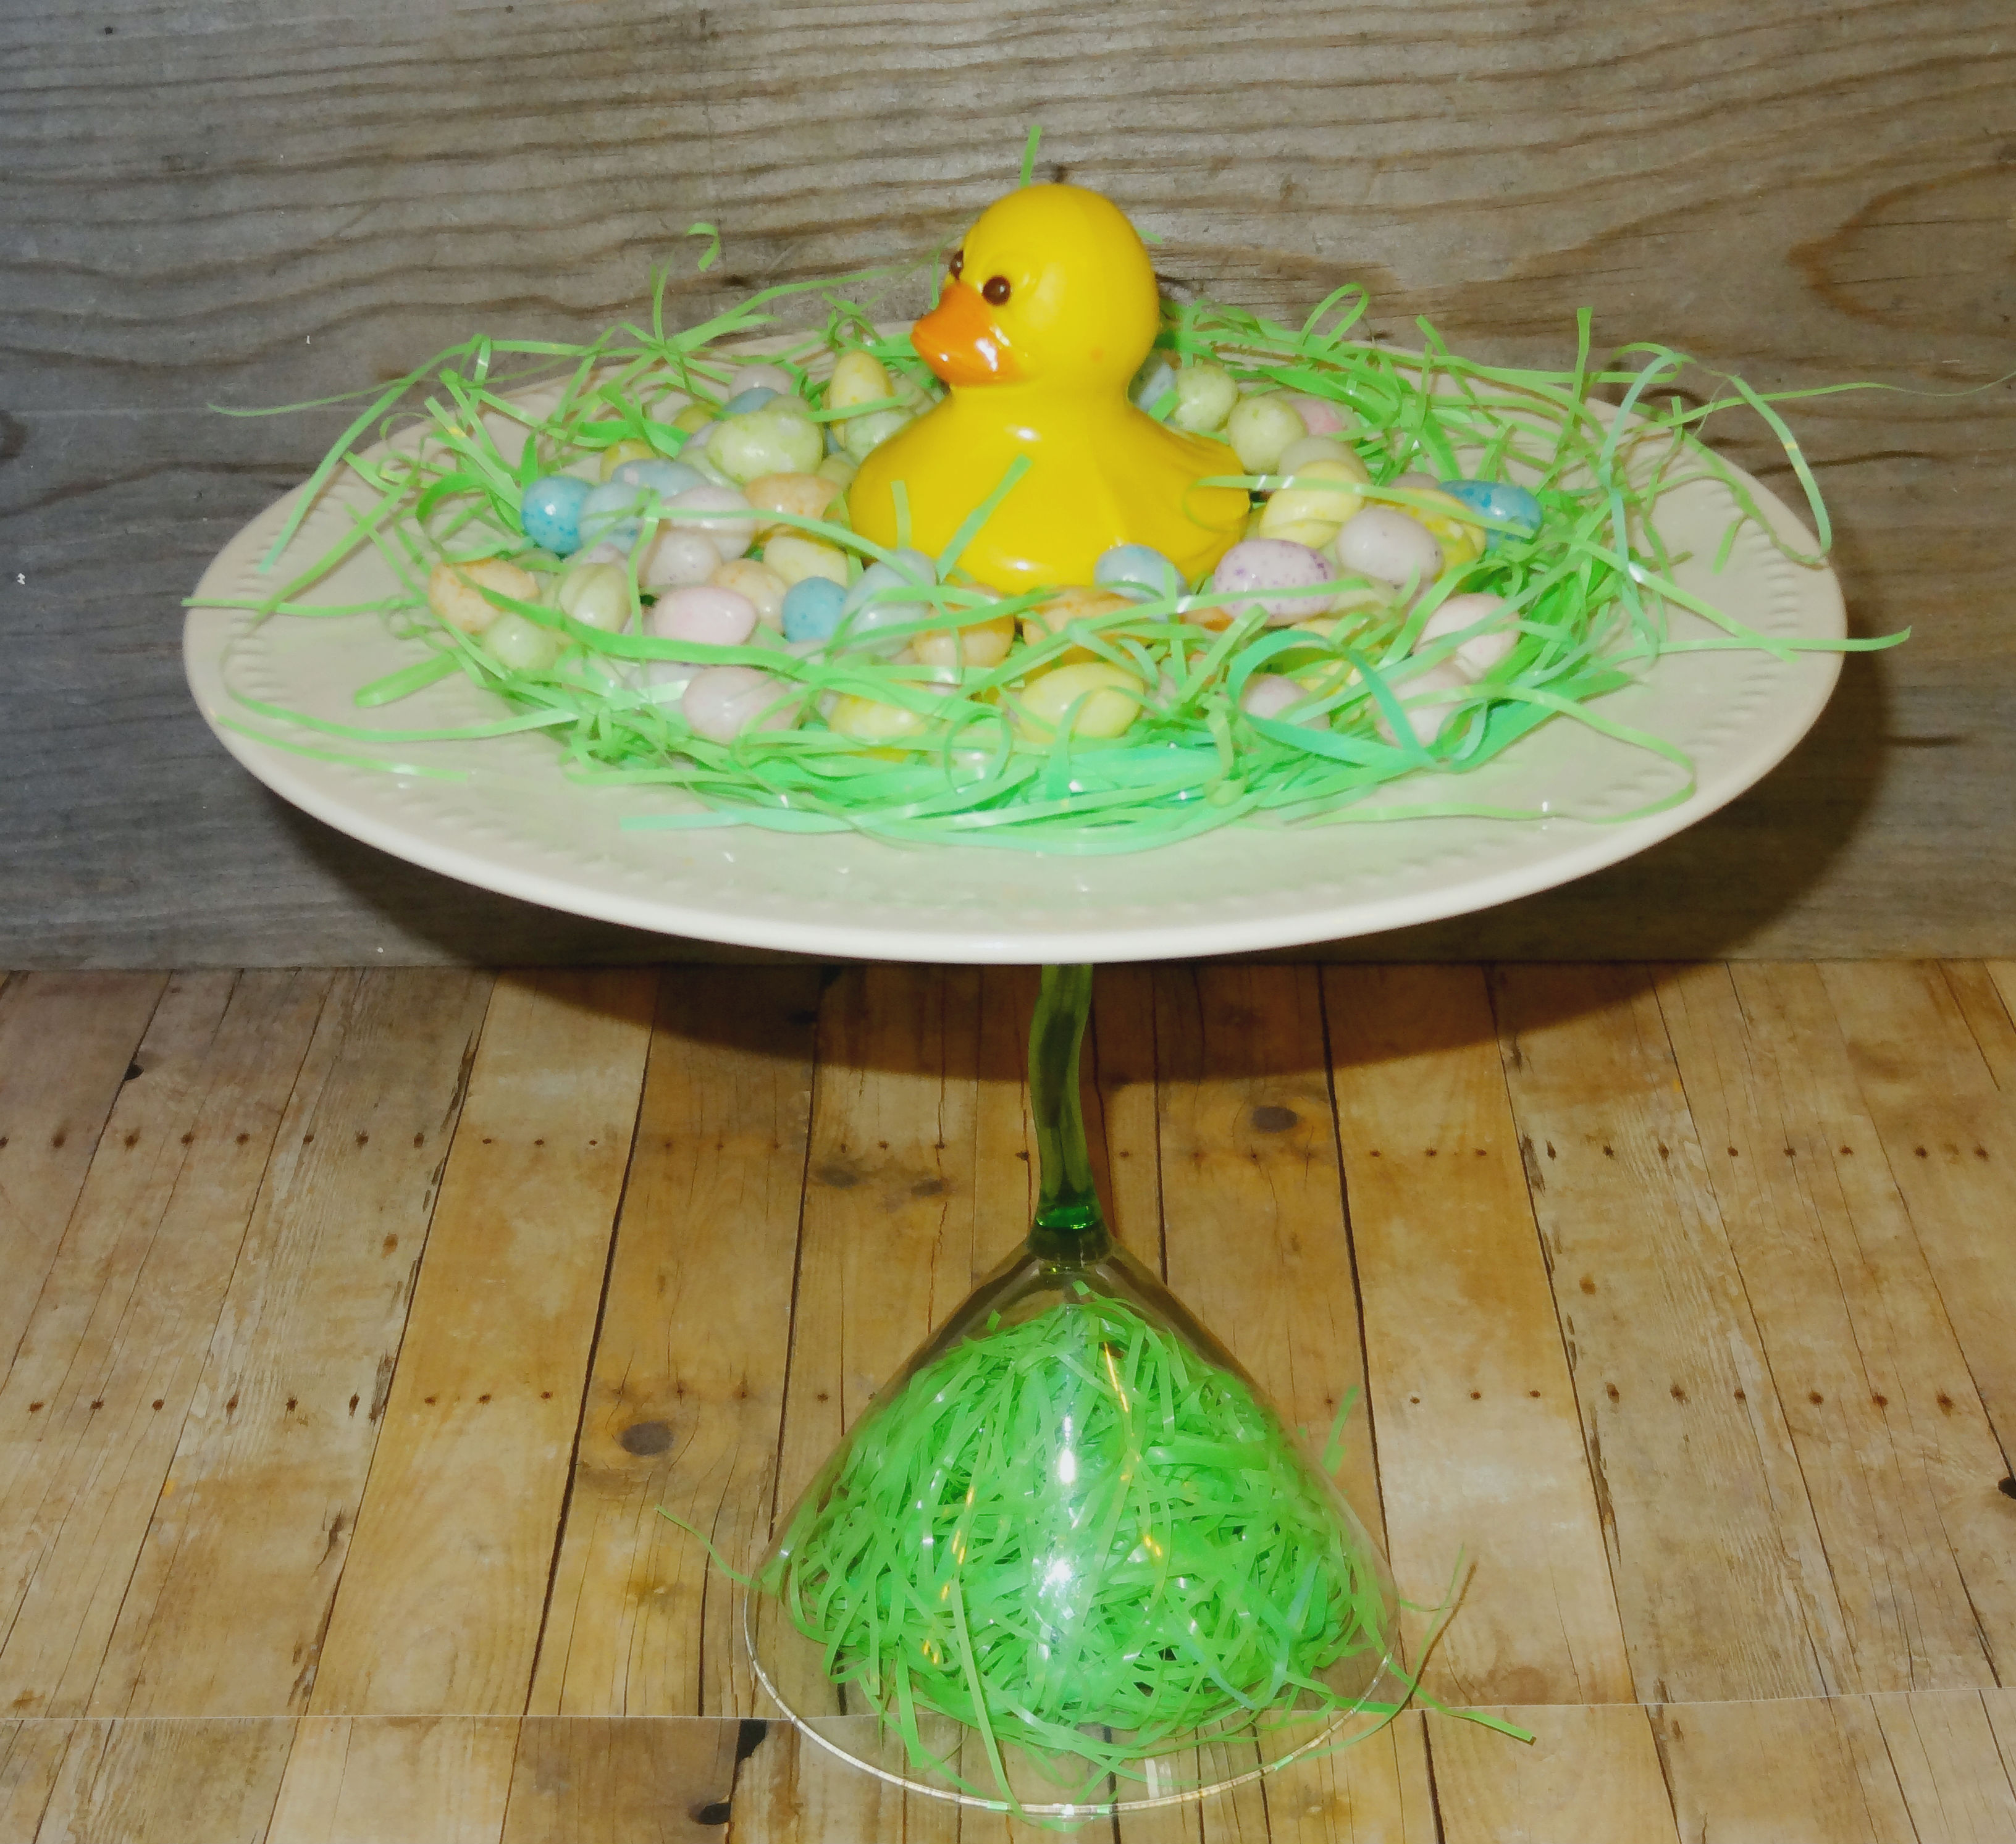
I wanted to use my pedestal serving tray as an Easter centerpiece so I purchased a few additional items. You can use whatever you want to make yours unique, but I used one milk chocolate rabbit, some bubble gum eggs and a package of green licorice.
Designing the centerpiece was easy. I spread the licorice around the plate and added the chocolate rabbit to the center of the plate. To add color, I topped the “grass” with bubble gum Easter eggs.
This is my kind of craft! I could have the entire project completed in less than 30 minutes. (That included glue drying time.) No one will realize I only spent a few dollars to make the craft and it’s a welcome addition to my Easter table.
What is your favorite simple Easter craft? Do you have any tips on how to make an Easter centerpiece?


Pingback: 15 DIY Easter Crafts and Decor - The Life You Live
Pingback: Tutorials For 10 #DIY #Easter Table Decorations #Crafts - Mom Knows It All. : Mom Knows It All.
love it! what a great way to use things you already have!
What a cute stand that is. I really like that!
That is a super cute idea … love it! Children, as wonderful as they are, definitely have a way of ruining anything nice. It’s great that you found a way to still enjoy your hobby in a different way for now. 🙂
What a cute idea. I love how easy and inexpensive it is.
Super cute. I thought that the duck was plastic! I am so going to ave to wander down to Dollar Tree and see what treasures are waiting to be found.
We don’t celebrate Easter like you do, usually with just a gathering with the family. Although it could help with a little twist!
wow this is very cute! although not sure I could have it around with toddlers and little preschoolers! The thin stem scares me a little but I love the idea!
What an original concept and very creative. I love you centerpiece.
That is such a cute Easter centerpiece! I love how easy it is to put together too!
Very clever! And perfect for the upcoming holiday!
HOW CUTE! I am going to do this only instead of a ducky I am going to use a Lindt gold wrapped chocolate bunny & hershey kisses! Thanks for the great idea!
That is so adorable! I’m not big on decorating for holidays because I’m not a crafty person but I think I could handle this one!
This is a cute idea. I have been thinking of stuff like this I can do with my kids.
This is so adorable! What a brilliant idea for a crafty easter decoration 🙂
My mother inlaw loves ducks. I think I will share this with her she will get a kick out of seeing a duck
I think I have the same plate! ha. Love this, it’s so simple and fun & bright! I don’t have a have any Easter crafts, yet..I will get some
This is such an adorable idea!
I love this! I usually use canning jars and fill them with festive fun colors.
This is so cute! I’m really getting excited for Easter now!
This is such a cute decorating idea. I would like to try it out at my house and see what hasppens.
This is creative and looks affordable. 🙂 Cute idea.
Love it. I did something similar with my son’s smash cake stand
Aww that is cute! Great job!
Ok, this is an amazing idea! I am going to pin it on my pinterest right now because this is definitely a pinterest worthy post.
This is a lovely centerpiece for Easter. I’m going to try to make one with my boys.
I’ve never thought of using an old glass to create a base. Great idea!
Totally cute! Would be perfect for our dessert buffet!
FUN and inexpensive! My kind of craft – thanks for the good idea 🙂
This is truly a wonderful idea. Your kids will surely have a great day with this project. 🙂
What a simple yet super cute centerpiece! It’s very affordable to make too!
This is such a cute centerpiece! I love using the martini glass as a base! Such a wonderful idea!
This is such a clever idea and super cute!
That is just so cute! What a creative, simple idea <3 x
This Is So Adorable I Must Make Thank You!
Oh my gosh, you are so smart. That turned out fantastic!!!
How cute.. I love the Dollar tree.. always affordable and I can always craft something fun, this will be on my to do list.. need something for my Kitchen table.. sooo cute…thanks for sharing
what a cute and simple way serve a nice spring dsh!
Oh my what a cute centerpiece and looks so easy to do may have to try and make one.
This is very cute! I’m sure my kids would ruin it in a snap though!
What an easy, inexpensive and cute centerpiece! How do you come up with these things?
What an adorable but easy centerpiece!
I can’t believe Easter is so quickly creeping up on us like this. I always loved the chocolate bunnies. Great centerpiece. 🙂 You always come up with such affordable, creative pieces.
That is so cute! And I love how simple it is too! I could totally make up a bunch of these for a party in no time at all!
adore this idea!! super cute!
I love that you added the grass to the base – such a cute centerpiece!
That is very cute! I love the grass under the bottom. Dollar Tree is one of my favorite stores!
Well how smart are you!?! I love this idea. Affordable and cute!
Very cleve to turn the class upside down. I can be used in so many ways.
This is such a cute idea! I need something like this for cakes and now I have a way to make it myself!
Now that is a great idea! Super creative and very cute!!!
What a fun idea! So cute.
WOW! You are so creative 🙂 I love this idea 🙂 thanks for sharing
Adorable and perfect for Easter! The best part is you can always change it up for other holidays and even special dinners. Thanks for sharing!
This is so adorable and such an easy idea! I am going to have to try to make one too now!
This is adorable! I’m going to make one of these with my girls!
Such a creative idea…and cute too!
This is so cute! What a fun decoration for Easter
How simple and fun yet so creative!!! Love this idea!!!
I love the Dollar Store glassware, too. It’s so cheap and perfect for crafts like this. Love Dollar Store crafts, thanks for sharing your idea.
This is so creative and so stinkin cute! I need to start thinking about my Easter decor. It will be here before we know it.
What a cute Easter centerpiece! I may have to make one for myself 🙂
Such a neat idea! I love that I already have the supplies at home – I can’t wait to decorate for Easter!
That’s adorable! What a cute idea!
TOO CUTE! I love it. That would look so cute on our food table for our Easter celebration! Thank you for the idea!!!
Well that’s cute as can be, and the kids could help too. Very nice! Thank you for sharing. 🙂 I was looking at the Easter candy in the store today and getting excited. 😉
Such a very cute Easter centerpiece. I am not very crafty, but love how I could easily make one of these myself. Very clever!
What a super cute (and easy) Easter centerpiece! I love how pedestal stands really can make a table seem so festive.
What a neat little trick. I would never have thought of this!
That is so cute and easy enough to do. I am getting ready to go thrift store hopping in a week or two so I will see what I can find.
That is so cute. Never really made one before, but yours is great. Thanks for sharing.
Cute idea – our Goodwill always has a ton of martini glasses for under $1 (must be lots of ex-drinkers here in Iowa).
That is a real cute idea. Love it!
What an easy and fun idea! Your DIY stand looks amazing!! Thanks for sharing your idea!!
I love how you put Easter grass under the glass base. So cute. I really love this idea and may use it for some Easter cupcakes I’m planning on using.
I love it! What an easy and fun idea.
Wow, that is so easy and I love the way it turned out. So cute.
I love this! The bright colors really pop for a centerpiece. It’s nice that I have all of the supplies already, except for the candy!